You can download a free trial version of Photomatix from www.hdrsoft.com
Get 15% off the Photomatix program (reg. $99) just by entering “beforethecoffee” in the coupon code box of the Photomatix purchase page.
Getting Started With Photomatix Version 4.0
It’s not unusual for a company to come out of the blocks in a full sprint and leave the competition in the dust. Look at Google, Ebay and the iPhone; they lead the industry in their categories and everyone else plays catch-up, When it comes to HDR software it’s Photomatix created by HDRsoft. Each new version of Photomatix incorporates new tools giving us more control over the final image and Version 4.0 is no disappointment.
This Photomatix tutorial covers Version 4.0 and will take you through it’s most popular tone mapping tool, Details Enhancer. So let’s get started.
In Bermuda I used a Nikon D2x with a fish eye lens and a tripod to capture the source image set of 5 images, each a different exposure: 0EV, -2EV, -1EV, +1EV and +2EV. These beach huts are made of canvas and when you sleep at night you can hear the waves crash under your bed. Pretty cool place!

Let’s jump ahead and see the final HDR image. If you take a moment and think about sunlit scenes you realize pixels in the shadow areas come from the overexposed images and pixels from the bright areas, like the sky, come from the underexposed images. These images are the building blocks of the final 32-bit HDR file.

Once you install Photomatix, double click on the icon and a window opens with 3 choices.

1. Load Bracketed Photos – This is the place to BEGIN, it will require an image set which may be 3 or 5 images.
2. Batch Bracketed Photos – Batch processing is used when you shoot HDR image sets all day long and have about 50 images and you’d prefer to go get a bowl of ice cream while the processing is done. The advanced feature now allows different size image sets in the same folder, 3 or 5 for example.
3. Batch Single Photos – This will allow you to do single image tone mapping on a folder of selected images. If you prefer to tone map one image file go to File>Open.
Tip: Batch processing is best when used to create 32-bit HDR files only. I avoid Batch processing that includes Tone mapping. Tone mapping adjustments are image specific so I prefer to apply adjustments to one image at a time.

Notice here I clicked Load Bracketed Photos then Browse then selected 5 tif files then clicked Select. This image set consists of 5 images taken at 1EV spacing.
RAW to Tif conversion? Notice that the images I’m about to load are TIF, however the camera was setup to record RAW files, should I convert my RAW files to TIF first? YES, the present thinking is to convert your RAW files to 16-bit TIF for better results. However, if I have lots of different compositions of the scene, I typically process and tonemap the RAW files, then I decide which composition is best, then I go back and convert the image sets to TIF.
Save 32-bit HDR file? There is a check box that allows me to view and save the 32-bit HDR image. Why would I want to save the 32-bit HDR image? The 32-bit HDR file is an intermediary file, you don’t look at it or print it. Having this file on hand saves you a little time if you decide to tone map the image again with different settings. I normally don’t save this file.
HDR formats? If I decide to save the 32-bit HDR file, what about the various formats?
The default format is .HDR, the two others are .EXR and TIF (floating point tif) they come in handy for research and testing. I always accept the default .HDR and move on.
Once you select your image set you are presented with this box. I recommend checking the “Align source images” as a routine setting. Keep the next 3 boxes unchecked for now, create a “Dry Run” tone mapped image, save it and inspect it for ghosting, noise and chromatic aberrations. If the problems are beyond what you want to repair in post processing then re-run the image set with the needed boxes checked and save it. This will allow you to compare the “corrected” image with the original.

Reduce ghosting artifacts – most of my ghosting corrections take place manually during post-processing so I rarely check this box. In Photoshop, I create layers and blend one of the single exposures into the tone mapped image. Typically, I FIRST tone map the single image before I blend it into the tone mapped image for a similar look.
Ghosting in your image? Who ya gonna call? The new ghost buster tool in v4.0 is much more sophisticated than previous releases so I recommend giving it a try. First chose the “Semi-manual” option. Then draw a selection around the ghosted area using the lasso tool, right click to select it, then right click again to set the photo you want as the source image, e.g. -2, -1, 0, +1, +2.
Tip: Ghosting is the result of a moving object. When I use a single image to blend into the tone mapped image I like to use the -1 or -2EV exposure. Why? Because the shutter speed is faster thus the moving subject is sharper, but watch for noise.
Reduce noise – v4.0 has high quality noise reduction with a new algorithm applied on the source images. Remember noise is part of your image at the time of capture as opposed to grain which is caused by excessive compression of the pixels, i.e. overly high strength settings.
Reduce chromatic aberrations – results can vary when this box is checked. I like to have the the “Dry Run” image for comparison.
If the 32-bit image appears just click Tone Mapping / Fusion

A new window will open and now the fun begins…..

The tone mapping portion of Photomatix can be considered the goose that laid the golden egg. The program has three tone mapping operators, Details Enhancer, Tone Compressor. and Exposure Fusion. Each is accessed as a drop down in the top left portion of the window.
Images tone mapped using Details Enhancer (above) can be very surreal. Details Enhancer is by far the most popular tone mapping tool. However, if Details Enhancer is too much for your taste, then Tone Compressor is an excellent choice for maintaining a natural look. If shadows are your preference, Tone Compressor can generate dark foreboding shadows with subtle noise free details. Version 4 has improved rendering of Tone Compressor and also added range of the sliders.
Exposure Fusion is another operator but doesn’t work with the 32-bit file. It blends the exposures and outputs an image with a very natural look. I sometimes refer to the “single-shot look” of Exposure Fusion to see how extreme my tone mapped image looks.
One of the obviously new features of v4.0 is the Preset Thumbnails Panel. It can be placed on the bottom or the right side of the tone mapping window. It not only allows you to click on a variety of built-in presets it also has a toggle to show all your saved presets. The built-in presets give you a nice flavor of what can be done to the original image. Your personal presets can have many variations, for example you might want to save presets for different lighting conditions. A night scene may benefit from desaturated shadows and a scene with a bright blue sky may benefit from greater highlight saturation.
Tip: A good way to reveal your sensor dust is to click on the Grunge thumbnail.
Version 4.0 also embeds the tone mapping settings in the processed image. Now you don’t have to worry about finding the settings file that belongs to the image, just click on “View Settings” from the main window and they appear.
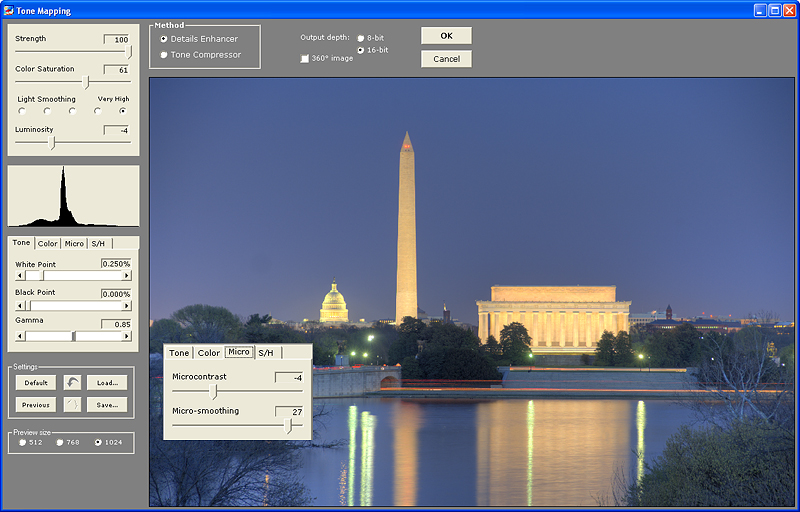
While you are tone mapping you’ll notice 3 tabs that expand for more adjustments. These adjustments can drive you bonkers so begin with the default setting. Experiment and play with them, try small and big changes but always watch how it effects all parts of your image. Keep in mind, a particular setting may work for one image and not at all for another. The yellow boxes below give you the nitty-gritty on each adjuster.
Tip: When making slider adjustments keep an eye on the histogram window. You’ll notice which sliders add contrast, i.e. pixels spread left and right, which sliders move all pixels and which sliders lock down pixels while moving others.
Here are the 3 tabs expanded for more adjustments.


Just like most things in life the best way to become proficient at tone mapping is to practice, practice, practice. It helps to photograph a variety of scenes even at different times of day to learn the pitfalls of HDR tone mapping. Before you know it you’ll be viewing images that you’re proud of. Here’s a few of mine that I enjoyed creating.

Skyline views from the world’s tallest residential tower in Australia make for nice city views but get close to the glass to avoid reflections. This is a straight out of Photomatix with no post processing.

Down low in the Gazebo at National Catherdral in Washington DC with a fish eye, I had to take 7 images at 1EV spacing to capture the dynamic range of this image. This is straight out of Photomatix.

This image taken in Bermuda required ghost repair of the beach swash (I used the -1EV image) and ghost repair of the splash in the distance. I also went through the aches and pains and manually used the rubber stamp tool to remove the chromatic aberrations in the rock face on the left.

After Photomatix tone mapping I opened the image in Photoshop and increased the luminosity of the lighthouse light. I also brightened a few of the rock faces and darken others for more contrast.

Black and White HDR can be very appealing just watch out for the same pitfalls like halos around objects that have a uniform sky as the background.

Adding this model to the HDR image required a detailed plan on how to light her and the balloons. There is a strobe just camera left (note the reflection in the balloons), I had her walking on the edge of a picnic bench placed on a hill. I had to shoot her from a low angle so the hill was essential. I moved her from the original scene to the HDR scene.

This is straight out of Photomatix except for some added leaves to cover hot spots and some dodging in the central part of the scene to give a subtle vignette. What I like is the small detail at the end of the road, a tire swing.

This is straight out of Photomatix followed with a layer of texture over the entire image. Nothing too fancy but it adds to the painterly look.

Here’s another with texture added. In this image I also added light to the street light by brightening it. This is one of those traveling carnivals that you had fun at but swear you’ll never let your children go to.
It only takes a small commitment of time each day to become proficient at HDR tone mapping. As you explore the possibilities, your unique style will begin to emerge that portrays your vision. I know when you analyze your surroundings, use your camera to express, find your vision you will capture the full range life has to offer.
Happy Shooting!
TIPS and TRICKS
HALOS – A halo is a fringe of brightness around an object that extends into a region of uniform tonality. Halos make you look like a rookie tone mapper and you don’t want that. You have two choices for controlling halos. First, control them while tone mapping or second, fix them in post processing.
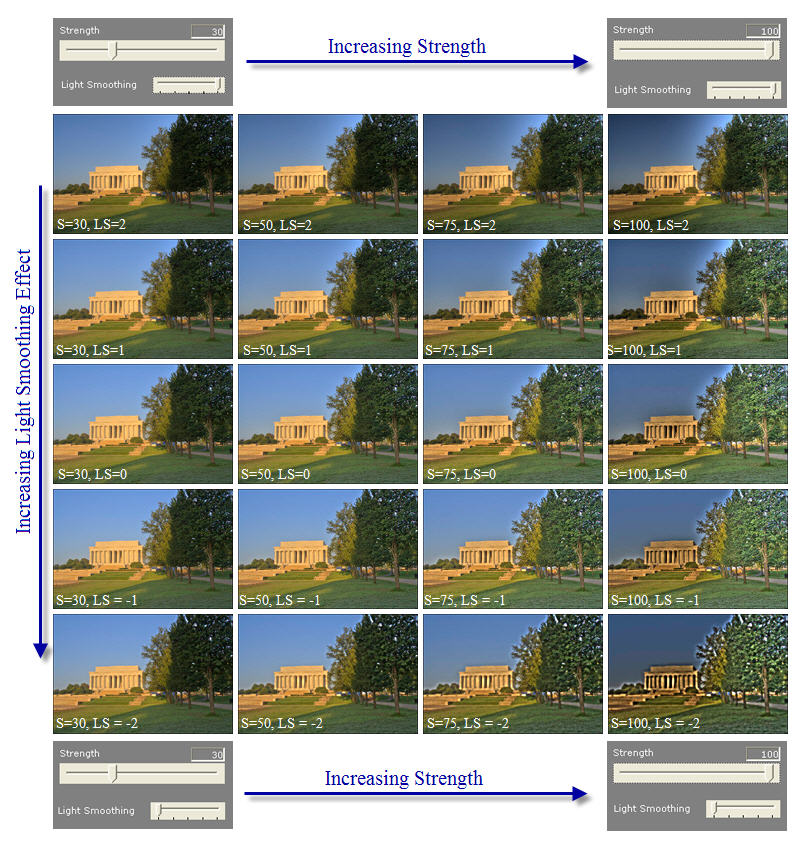
A building that extends into a blue sky is a good example where halos often develop. Lowering Strength is usually sufficient for controlling halos. However, the Highlights Smoothness slider in the Miscellaneous window is very useful for controlling halos in the bright regions of the image. If the bright region has halos eg. blue sky, then raising Highlights Smoothness will control them and even allow you to push the Strength slider to higher values.
Here is a shot of the Lincoln Memorial with a blue sky. You can see the effects of Strength (S) and Smoothing (LS) in action and how blue skies are problematic. Watch how the halo around the tree increases when Strength is increased (right) and notice how Smoothing opens the shadows where the leaves are (down). Generally, Strength creates halos (right) and Light Smoothing create tone reversals (down). The image that is closest to a conventional single shot is top left. The most extreme is bottom right.
If you do end up with a halo consider blending the tone mapped image with a single source image using layer/masks in Photoshop. Here is an image that has the blue sky from -2EV image blended with the tone mapped image. To review HDR post processing you can click the link under tutorials called Post-processing.

Tone Reversals
Give an image an unnatural appearance by creating strong tone reversals and halos and most people will say, “Wow!” for the first 10 images. After 20 images they’ll say “not so sure” and by 25 they’ll say “it’s way overdone.”
Tone Reversals – Tone reversal are the result of taking regions of an image that we would normally perceive as darker than other areas and making them brighter. We all have visual perception that the sky is the brightest part and under the trees is darker. Notice the effect of tone reversals in the Lincoln Memorial (above) as you move through the thumbnails to the bottom right. The answer to correct tone reversals is raise the Smoothing followed by lowering the Strength.
Noise
Noise is that set of brightly-colored randomly-spaced pixels in your image that is saved when you take the image. It’s a by-product of the camera electronics and it destroys details that cannot be recovered. Noise is mostly in the shadow area and it’s important to know tone mapping can enhance it.
How to lessen noise in the image:
- Lower the Luminosity slider – Be careful raising this slider above default, it’s cool because it raises shadow detail and add compression but it enhances noise if it’s there.
- Lower Strength to render the shadow are darker – remember increasing Strength moves the image toward tone reversals ie. brighter shadows.
- Raise black point to render the noise-full area darker or black
- Under Color settings – Lower Saturation Shadows for color noise
- Under the Miscellaneous settings – Raise Shadows Smoothness and Shadows Clipping (sparingly)
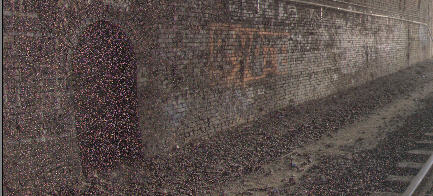
Default values with added Luminosity (+3) Noise is enhanced. Why the noise anyway??? Well I merged images that didn’t capture the full dynamic range, tisk tisk.
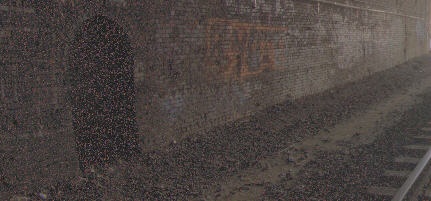
Making the slider adjustments shown above I’ve suppressed the noise at the expense of local contrast. Notice how the smoothing functions lower the brick details but make the noise less obvious. Now there’s a good reason to capture the full dynamic range.
Grain
Grain is caused by excessive local compression in the tone mapping process. It can obliterate details, just like noise, but details are recoverable by making the key adjustments that lower compression. Grain is most common in the dark portions of cloudy skies. Click on the area for a look at the 100% preview after each adjustment. Don’t adjust while in 100% preview.
Grain – Try these controls and notice that they all effect compression.
- Lower the Strength – effects compression
- Lower the Luminostiy – effects compression (can counter darker tone with Gamma adjustment)
- In the Miscellaneous window raise Micro-smoothing, Highlights Smoothness, Shadows Smoothness
- Lower microcontrast – effects compression
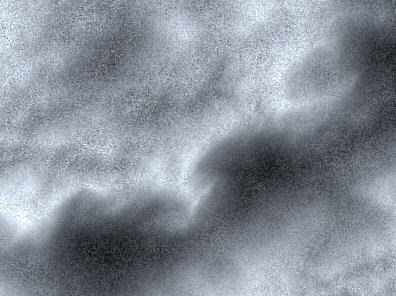
Grain high. Note – this is not noise.

Grain Low
So now we have Tommy Toner who has great intentions but doesn’t quite have the tone mapping touch. He gets some of the image looking real nice but that sky is full of grain. Most would say he increased the strength to much, others might say he didn’t take enough images.

- Lower Luminosity and counter by raising Gamma (Tommy has them backwards).
- Lower Microcontrast and raise Micro-smoothing.
- Raise Light Smoothing (not essential but changed)
Here is Tommy’s much improved image with the changes made. Wow, notice the noise is gone and the halos are barely visible but Tommy has given up some local contrast in the Memorial’s.
What can be done about the loss of local contrast? Can I have my cake and eat it too: local contrast with little grain in the sky or clouds? Yes you can if you use post processing. Tommy cleverly saves both images, opens them in Photoshop and blends the grain-free sky with the image with nice local-contrast and posts it to Flickr and everyone makes it their favorite and sends him lots of awards and he’s famous.
You can also download a free trial version of Photomatix from www.hdrsoft.com
Get 15% off the Photomatix program (reg. $99) just by entering “beforethecoffee” in the coupon code box of the Photomatix purchase page.
 My latest book is about the new and exciting techniques in HDR Photography.


Excellent tutorial that many folks on flickr could definitely benefit from. You use easy to understand language and identify some of the key pitfalls. Well done!
Comment by Michael — April 13, 2007 @ 5:57 pm
I’m just beginning to get into HDR and this tutorial is certainly helpful. Well written and thoroughly explained, it makes so much more sense than anything I’ve read up to now. Thank you very much for taking the time and effort to write this and your other tutorials.
Comment by Marianne — April 14, 2007 @ 7:35 pm
excellent
Comment by syaefullah kamal — May 13, 2007 @ 3:42 am
Love your work, and the tutorial is helpful.As I am just trying before buying, may I ask a few questions? I haven’t shot any images with bracketing. I just took some raw images and altered them by a stop or 2, then saved them as .psd. When I generated them in photomatrix, they didn’t look so good. I guess it is better to use the bracketed in camera images. Also how many stops do you bracket? Thanks, maybe I will buy after some experimenting.
Comment by ron greco — July 1, 2007 @ 9:58 pm
My goodness. I downloaded the trial software a month ago, and tried a few by bracketing raw files just to get started and they were nothing like yours, and other’s I have seen from “true” bracketing.
I’ll go out and try a few shots to specifically try with the software, now that you’ve provided simpler instructions. I’ve very much wanted to produce some HDR photos, but got discouraged.
Plus the discount will help a lot, and I finally have a computer powerful enough to properly work with large files.
Comment by JAM — July 10, 2007 @ 11:34 am
Thank you very very much!
I sadly noticed, just when I came along a little bit with the sliders, a new version (2.5 – free upgrade) came out and they added some more sliders!! The more sliders to adjust, the harder for me to get an acceptable result :.-(
Is there a possiblity that you comment on the new settings of version 2.5 ?
You are so right. I will update to include Version 2.5. Thanks.
Comment by Christian Stocker — October 18, 2007 @ 1:56 pm
I’d like to get started in HDR. Knowing that there are freewares like Qtpfsgui, do you clearly see the value of spending $99 (-15) in Photomatix ? Thnaks in advance.
Laurent,
I’ve used 6 different programs for merging and tone mapping HDR images and have found that they are certainly not created equally. Each program will give a different HDR image result for the same scene (same image set). The differences are due to the way the algorithm merges to HDR (creating the 32-bit image) and the way the tone mapping compresses the image. Photomatix and FDRTools are programs that I use regularly because the results are excellent. I do think Dynamic Photo HDR also has a good program worth giving a try.
Writing HDR software requires extensive tweaking and massaging to get good results. Most programmers of HDR-freeware are not willing to spend countless hours writing upgrades and fixes to generate an image that is par excellence. I have worked with Qtpfsgui and didn’t feel the results were nearly as good as the other programs that are available for purchase. That said, you can try them all for free and decide but I think you will find the results of the three programs mentioned above are worth it.
Good Luck, Drop a note back and let us know what you decided.
Ferrell
Comment by Laurent Legrandjacques — November 16, 2007 @ 8:01 am
[…] We talk about HDR and how various cameras have an advantage over others. Photomatix control explained by Before The Coffee. […]
Pingback by PhotoGeek week #37 | photogeek.tv Podcast for the geek photographer professional prosumer or keen beginner — January 30, 2008 @ 9:16 am
Thank you SOOOOOOOOOOOOOOOOOOOOOOOOO much
I was looking or a tut like this for ages…
TJ
Comment by TJ — February 19, 2008 @ 6:29 am
Thank you very much, best Photomatix tutorial I`ve found (and I`ve been through many!)!!
Comment by S. S. — March 7, 2008 @ 9:06 pm
you are wonderful !! 🙂
thanks for the best tutorial!
Frank from germany
Comment by Geschenkideen mit Gravur — May 17, 2008 @ 10:23 am
Your tutorial is awesome! Probably the best I’ve found! Great job, thank you!
Comment by Mixyourmind — August 12, 2008 @ 3:32 am
[…] Pro and tried it out. I have to say that I like those kind of sharp dreamy-like photos. This tutorial is really tons of help. Just want to share with you what I had come up […]
Pingback by Rarararandom « Blink with Me — August 14, 2008 @ 9:30 pm
sooooooooooooooooooooooooooooooooooooooooooooooooooooooooooooooo
buetiful place……..ha!ha!
Comment by dhevanagini — August 18, 2008 @ 6:10 am
Like your book, a very practical & useful piece of reading…. I now feel much better equipped to tackle Photomatrix.
Thank you … (BTW I’m closely related to your friend Tommy Toner!)
Keith
Comment by Keith — August 30, 2008 @ 1:18 am
Hi,
good tutorial indeed. But it has one flaw. Qtpfsgui is *not* freeware. Actually it is opensource software.
Comment by michal — September 9, 2008 @ 12:21 pm
Thank you,
Finally found a site that explained how to actually make Photomatix work for me.
Trial & error is OK but sometimes you can really spin your wheels trying to figure things out.
I just downloaded 3.0 a couple of days ago and was looking for some direction. This will be a great help.
Thanks again,
Carlton
Comment by Carlton Ward — September 9, 2008 @ 9:30 pm
Excellent tutorial. I bought Photomatix and am slowly working my way through a series of tests such as the one that lead me to believe that tif images processed from my D300 RAW files in Capture NX give better Photomatix results than feeding the RAW direct to Photomatix (of course at a slight expense in extra processing time). I’ve downloaded the trial version of Essential HDR. Have you tried this program?
Comment by Ed Knepley — September 20, 2008 @ 8:55 am
I tried Essential HDR, but i didn’t really think much of it. It’s a simple and fast HDR app but it really seems like it just does tone mapping in the same way you would with using Levels and Edge detection. Where as i find Photomatix and Artizen HDR to really produce effects that to this day i can’t seem to reproduce using any of Photoshop’s none HDR filters such as Levels/Curves and Highlight and Shadows.
On which i personally like better is something i can’t say as of yet cause they each have something that the other doesn’t, so i tend to find myself either merging in Photomatix and then tone mapping in Artizen or visa verse.
Comment by JamesTaylor — October 20, 2008 @ 1:43 pm
Thank you for your website 😉
I made on photoshop backgrounds for youtube, myspace and ect..
my backgrounds:http://tinyurl.com/6exhae
take care and thank you again!
Comment by createmo — November 2, 2008 @ 12:20 am
Well done! Probably the best tutorial I have seen also.
Comment by Reily — November 27, 2008 @ 12:34 am
Great tutorial and discount thank you I will buy it now so that I can take the Photomatix watermark off my pictures.
Comment by PAUL — December 3, 2008 @ 2:19 pm
I`m so impressed by your website. Absolutely the best I´ve seen about HDR. The tutorial is easy to follow and very instructive. Must get your book as well. Will be coming back again and again and again.
Merry X-mas and a Happy New Year
Jannica
Stockholm Sweden
Comment by Jannica — December 19, 2008 @ 1:21 pm
I just purchased your book only to find that the latest version of Photomatix is quite different, yet again with the latest update!
Is there a chance you will update your tutorial again to cover this new look for Photomatix?
I think your photos are unbelievable and I am anxious to get some photos to play with using your techniques!
Comment by Linda — January 3, 2009 @ 12:45 am
Wanted to say “Thank You” for the Photomatix tutorial. I bought the program about a week agao after I tried another program(Topaz Adjust) which just didn’t offer the range as Photomatix. Being new to the program I did like most people do and just messed around with the settings not really having any idea what I was doing. After reading your post I feel I’ve got a firm grasp on the basics and along with a strong Photoshop background I feel this may be another way to express my vision through art. Ordering your book today as well!
Comment by Tim Wise — January 5, 2009 @ 1:41 am
just got PHOTOMATIX, This tutorial is invaluable, its just what i needed, its fab in fairness , many thanks, i’m ordering book tomorrow#
john cork ireland
Comment by john oshaughnessy — January 5, 2009 @ 6:45 pm
ijust bought and finished your book and loved it. HDR is something I want to add to my knowledge of photography. It has me very excited about the possibilities but if I buy Photomatix do I still have to buy more software like Artizen? Thanks
Comment by fred — January 14, 2009 @ 3:57 pm
My HDRs look fine until I begin output sharpening with either Lightroom or Photoshop. That is when the grain begins appearing. The prints are sharp but grainy, especially winter scenes with snow. Question is, does an HDR need as much sharpening as a non HDR photo?
Comment by jeff gibson — January 25, 2009 @ 11:46 am
My mistake… I meant input sharpening not output sharpening.
Comment by jeff gibson — January 25, 2009 @ 11:48 am
Hello, We are looking for speakers for our annual meeting, BIOCOMM 09. Would you be willing to travel to Park City, Utah on Wed, July 29, 2009 and give a 3 hour workshop on HDR? Can you get sponsorship from Photomatix? Please get back to me for more details, ASAP as we are formulating the program now.(2-6-09). Thanks, Adam Cooper, Workshop Chair, BioCommunications Association. http://www.bca.org.
Comment by Adam Cooper — February 6, 2009 @ 5:47 pm
Sir,
Can you please go into more detail as to how the shot of the Salter’s railroad depot was generated? I absolutely love the look and feel of this shot, and as I am now retired, I’ve got nothing but time on my hands, and a lot of ideas that will translate to HDR very well.
Thank you very much….
Jim
Comment by Jim Martin — February 23, 2009 @ 8:15 pm
Certainly clears away some of the mystery with Photomatix, great tutorial, nicely written, concise, to the point, and the visual aids are superb.
Thanks
Tony. ( UK )
Comment by Tony Bevington — February 24, 2009 @ 8:03 am
[…] Tips From Before The Coffee […]
Pingback by HDR贴士 | 勇敢的心 — March 20, 2009 @ 8:27 pm
Great tutorial. Wish I had read it before buying the password. Could have saved $15 bucks.
Comment by Tiger — April 2, 2009 @ 9:38 pm
I used your discount code. Thanks for the good information!
Comment by ccievoice — April 29, 2009 @ 2:53 pm
Love your HDR photos..it is a new tecnique for me. I am wondering if I get this software, can i work it with Elements 7? Thanks for the tutorial!
Comment by charlotte wilson — May 21, 2009 @ 1:11 pm
Getting started. Considering PS E7. Can you process HDR shots effectively in that program?
Thanks…and love your book (and tutorial).
MB
Comment by Moran Budget — June 6, 2009 @ 11:48 am
I love the tutorial but I am confused by the Lincoln Memorial example.
Should not the down arrow to the left of the block not read “Decreasing Light Smoothing Effect” ?
Comment by Shamley Green — May 22, 2009 @ 6:34 am
Very good article.. thanks for sharing your knowledge…
Comment by chandra — June 2, 2009 @ 5:23 pm
[…] Before the Coffee – Photomatix Pro Tutorial […]
Pingback by HDR Photography Workflow Series: *BONUS - HDR Tutorials & How To | Nuwomb Creative — June 8, 2009 @ 4:21 pm
Thank you very very much! best Tutorial!
Maria
Comment by Fotogravur — June 12, 2009 @ 12:37 pm
[…] Before the Coffee – teaches the secret of masking different HDR results of the same […]
Pingback by Creating HDR - Resources for Tutorials | Gr8tFate.com — July 21, 2009 @ 8:35 pm
[…] would be hard pressed to find a better view anywhere in San Francisco. This shot was generated with Photomatix Pro blending three photos at three different shutter speeds. The end result is called HDR, or a […]
Pingback by Sanctuary in the City « Fish Eating Grin — July 26, 2009 @ 11:06 am
[…] 8. Photomatix Pro HDR tutorial from Before the Coffee […]
Pingback by 10 Tutorials on How to Create Stunning HDR (High Dynamic Range) Images | Graphic Design Free Resources — July 31, 2009 @ 6:02 am
High Dynamic Range (HDR) Tutorial using 1 JPG
High Dynamic Range (HDR) Tutorial using 1 JPG states “how to convert simple images into awesome and inspiring one”. Specially beginners will find this tutorial very useful in passion of increasing their HDR skills (HDR using Adobe Photoshop and Photomatix)
see HDR Tutorial here…
Comment by SheikhNaveed — August 20, 2009 @ 1:22 am
[…] Tutorial HDR Photomatix Pro […]
Pingback by 10 + 2 tutoriales para crear sorprendentes imagenes HDR — August 24, 2009 @ 3:03 pm
How much do you use Photoshop in your HDR process? Does your book go into that?
Comment by Leif Petersen — September 2, 2009 @ 4:30 pm
[…] is Photomatix? http://www.hdrsoft.com/support/help_files/WhatIs.htm step by step helpful tutorial. https://beforethecoffee.wordpress.com…atix-tutorial/ __________________ experience is everything! Value is in the eye of the beholder!!! I'm a […]
Pingback by Canonites Only Club - Page 15 - Manhattan Reefs — September 20, 2009 @ 8:43 am
Great tutorial lots to learn with this program having fun getting started Thanks for this.
Comment by Lisa — November 30, 2009 @ 10:47 pm
I used the coupon – it’s still working fine! Thanks a lot.
Comment by Rabattkode — December 4, 2009 @ 11:40 pm
[…] can get it with a 15% discount if they enter a discount code when ordering it. Go to this site:- here. Look for the discount code in the text, and enter it when ordering at the vendor's site. For a […]
Pingback by Photomatix Discount - The Photo Forum - Photography Discussion Forum — December 9, 2009 @ 7:09 am
I am very much enjoying your book. Unfortunately, the Photomatix tutorial section, like the above, is already out of date. Could you please update to help with the new slider controls in the latest version?
Comment by Ken — December 29, 2009 @ 4:40 pm
Photomatix originally turned me onto and then off of HDR imagery… I was sick of that Halo effect. But I just wasn’t tweaking things enough. I finally went back and reworked something, similarly to this tutorial, and got great results.
I think the most important point is that Photomatix does not necessarily have to be the catch all, you can take two Photomatix images and continue to improve them in Photoshop.
I’d love to see a Mask option in Photomatix, where you can have different settings for different parts of the picture, basically eliminating the Noise/Contrast problem.
Comment by Chris — January 3, 2010 @ 5:52 pm
very Informative post..thanks.
Comment by Dhanang — January 19, 2010 @ 9:23 am
[…] 7. Photomatix Pro HDR tutorial from Before the Coffee […]
Pingback by High Dynamic Range Tutorials — February 5, 2010 @ 11:32 pm
Been reading this post up and down the last 6 month. Been to great help for me. I am no expert, but now I manage to make HDR images out of most things. Waiting for a new camera, then heading up in a plane to try to catch some city photos. Wish me luck 🙂
Comment by nyttiggreier — February 7, 2010 @ 2:55 pm
Hi I wanted to know is it possible to do a multiple scene HDR composite and if so what do I need to do I guess It would be a total of 3 different set images but how do I handle that
Comment by Malikah Bakir — February 9, 2010 @ 12:24 am
This tutorial worked for me. I found that it showed me more than I expected and now I am an HDR fanatic. Would this tutorial be available at some time in the future in PDF format as it would make an exellant field guide to carry with you out in the field.
Comment by Raymond Ankney — March 14, 2010 @ 1:03 am
This tutorial is fantastic and clear.A new world in the photo.the door is open for new ideas..
The program can make fantastic pics by some clicks.
thks
Comment by Sito ruiz — March 24, 2010 @ 11:04 am
[…] Stuck in Customs: HDR Tutorial Abduzzedo: How to create HDR Photos – HDR/Photomatix tutorial Before the Coffee: Photomatix Pro Tutorial The 23X Blog: Beginner’s Guide to HDR Greg Roberts: Simple guide to HDR – High Dynamic Range […]
Pingback by HDR Tutorial « Kah Wai Photography Blog — April 8, 2010 @ 10:04 am
I have your book, and read it everynight. I have learned a lot, but have not purchased the software as yet.
My question: Can you combine a tiff, jpeg, and a raw image to achieve the HDR result? Sounds silly I know, buy I was just wondering if that is possible?
Thanks
Comment by Stanley Sims — April 13, 2010 @ 12:15 am
Thanks a lot for the great tips !! i will go and buy your book !! cheers
Comment by Nick — May 3, 2010 @ 1:13 pm
I have a difficult question here. Let’s say I’ve created a panorama in Photomatix Pro. I made my adjustments in Tone Mapping for the first image in the panorama and never changed those settings as I individually processed the remainder of the images that would make up my panorama. Later I discovered I had forgotten to add the final image to the panorama. Here is where the problem began…..
I had used Tone Mapping on another set of images and changed my settings. How do I match the original settings used for this final image to be added to the panorama?
Comment by dikjenkins — May 22, 2010 @ 10:41 am
Excellent tutorial. This is exactly the information I’ve been looking for…a good general HDR tutorial for beginners. I currently am interested in getting good at HDR for the purpose of generating stock images. I end up with results that are on first glance engaging. Ultimately though I’m plagued by noise and/or halos. Thank you!
Comment by Rachael Towne — June 27, 2010 @ 9:43 pm
[…] 8. Photomatix Pro HDR tutorial from Before the Coffee […]
Pingback by 10 Tutorials on How to Create Stunning HDR (High Dynamic Range) Images | cameralogs.com — July 23, 2010 @ 12:36 pm
Just so everyone knows, Ferrell is a stand up guy…I emailed him asking if his 2008 book(Complete Guide to HDR Digital Photography)had an update to correspond to the later versions of Photomatix.
Within minutes, he responded and pointed me to this update. All I can say is…thanks!
Jerry, Thank you for the compliment, Good Luck with your HDR! Ferrell
Comment by Jerry Gammon — August 3, 2010 @ 12:02 am
[…] the "max". Most of the times it looks horrible. Here is a good tutorial for photomatix: Photomatix Before the Coffee And a HDR I have made: __________________ "It seems to me that the idea of a personal […]
Pingback by HDR Photography - Tilted Forum Project Discussion Community — August 6, 2010 @ 6:44 am
[…] […]
Pingback by HDR help — August 7, 2010 @ 3:19 am
thank you for the information,
This was helped,
spirit! ! ! ! !
Comment by jobvacancies — August 11, 2010 @ 4:42 pm
Thanks so much for taking the time to make this tutorial. I love your pictures!
Comment by gsfay — November 11, 2010 @ 3:56 pm
Just ordered 2 of your books. One for a gift. Great price on Amazon…..
Comment by gsfay — November 11, 2010 @ 4:03 pm
I have compared results from Photomatrix 3 to Photomatrix 4 and have found that (for me) the P3 results look much better ie better textures, deeper tones etc while the P4 results tend to have a ‘haze’ across them and lack the textures and deeper tones. Is there something I’m missing with P4.
Comment by Mark — June 9, 2015 @ 7:11 pm
Hi wordpress.com
SEO Link building is a process that requires a lot of time.
If you aren’t using SEO software then you will know the amount of work load involved in creating accounts, confirming emails and submitting your contents to thousands of websites in proper time and completely automated.
With THIS SOFTWARE the link submission process will be the easiest task and completely automated, you will be able to build unlimited number of links and increase traffic to your websites which will lead to a higher number of customers and much more sales for you.
With the best user interface ever, you just need to have simple software knowledge and you will easily be able to make your own SEO link building campaigns.
The best SEO software you will ever own, and we can confidently say that there is no other software on the market that can compete with such intelligent and fully automatic features.
The friendly user interface, smart tools and the simplicity of the tasks are making THIS SOFTWARE the best tool on the market.
IF YOU’RE INTERESTED, CONTACT ME ==> moneyrobotsubmitter@mail.com
Regards, Alfie
Great Britain, NA, Kirk Michael, Im6 1gf, 64 Emerson Road
Comment by Alfie Gilreath — November 30, 2018 @ 6:32 am
Flourishing through Teenage Years: Nurturing Teen Kids Ages 14-17 Introduction: Adolescence is a exhilarating and transformative phase of life, filled with growth, difficulties, and self-discovery. For parents of young boys aged 14 to 17, this period marks an essential juncture in their children’ development. In this post, we check out the special experiences of teen young boys and offer useful pointers to support and empower them on their journey to becoming responsible and confident boys. 1. Embracing the Teenage Mindset: The teenage years are marked by significant physical, emotional, and cognitive changes. Adolescents might display increased emotions, a need for self-reliance, and a desire to develop their identities. Comprehending their developing frame of mind is important in offering assistance and assistance. 2. Efficient Communication is Key: Open and honest communication forms the bedrock of a strong parent-son relationship. Produce a safe area where your child feels comfortable revealing his thoughts and emotions. Be a mindful listener, offering understanding and empathy. 3. Motivating Self-Confidence: Teen kids may grapple with self-esteem issues and insecurities. Encourage their passions, celebrate their achievements, and advise them of their special strengths. Building self-confidence empowers them to face challenges with courage. 4. Balancing Independence and Boundaries: As teens look for autonomy, moms and dads need to strike a balance between approving self-reliance and setting sensible boundaries. Permit them to make choices and find out from experiences, while supplying assistance and support. 5. Nurturing Interests and Hobbies: Support your child’s interests and pastimes, whether it’s sports, arts, academics, or any other pursuit. Participating in activities that spark enthusiasm enhances their self-expression and fosters personal growth. 6. Promoting Emotional Well-being: Teenage kids might struggle to express their emotions honestly. Motivate them to acknowledge and discuss their feelings, promoting psychological intelligence and durability. Encourage looking for aid when needed. 7. Cultivating Healthy Friendships: Buddies play a crucial role in a teen’s life. Encourage your boy to cultivate encouraging and positive friendships, and guide them in resolving disputes amicably. 8. Emphasizing the Importance of Responsibility: Teach your kid about responsibility, both at home and in their actions. Tasks, time management, and responsibility for their options impart valuable life skills that prepare them for the adult years. 9. Navigating Digital Spaces Wisely: As innovation becomes an integral part of their lives, inform your son on responsible usage of social media and digital platforms. Promote online security and awareness of possible risks. 10. Celebrating Personal Growth: Commemorate your child’s growth and accomplishments, small or big. Acknowledging their development cultivates a sense of accomplishment and motivates constant personal advancement. Conclusion: Teenage years is a transformative and formative duration in the lives of kids aged 14 to 17. As moms and dads, providing support and guidance is vital in supporting confident, responsible, and well-rounded boys. By communicating openly, promoting confidence, and encouraging individual growth, we empower our boys to browse life’s difficulties with resilience. Each teen kid is special, and there is no one-size-fits-all method to parenting during these essential years. Accept the journey with persistence, understanding, and a sense of experience. Together, we can direct our children through teenage years, instilling worths that will shape them into thoughtful, capable, and successful individuals as they shift into adulthood.
Comment by Jessenia Launius — August 11, 2023 @ 1:04 pm