Tone mapped HDR images are rarely perfect when the HDR program finishes with them. They can look flat, lack overall contrast, and can suffer from artifacts, ghosting and halos.
Many problems can be corrected in post processing using:
-
Levels/Curves
-
Simple cloning
-
Blending of the tone mapped image with another image to restore realism.
-
Blend the RAW single image with the HDR image. You can blend the 0EV, -2EV or +2EV.
-
Tone map the RAW image and then blend with the HDR. A pseudo-HDR with the HDR image.
-
Blend two HDR’s each processed with a different tone map setting.
-
Blend an HDR image created with a local operator such as Details Enhancer (Photomatix) with an HDR image created with a global operator such as Tone Compressor (Photomatix).
-
Restore Image Contrast
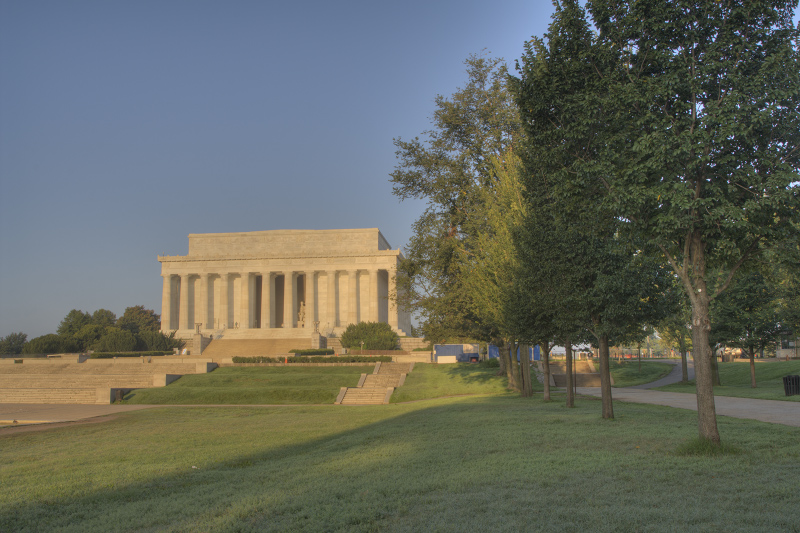
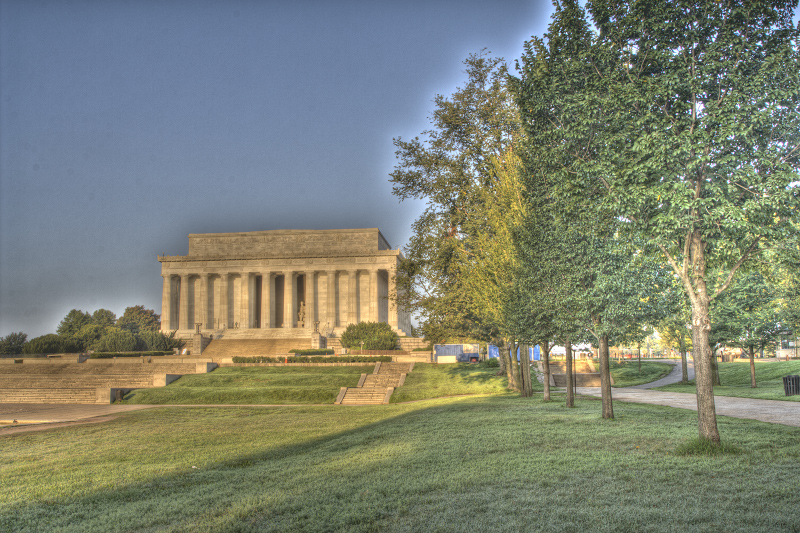
The process that converts the HDR image to an LDR image offers the benefits of added detail however; it comes with a price, a loss of global contrast. The Lincoln Memorial has been tone mapped conservatively to avoid halos and noise, but in spite of light tone mapping, the image looks flat and hazy.
BEFORE
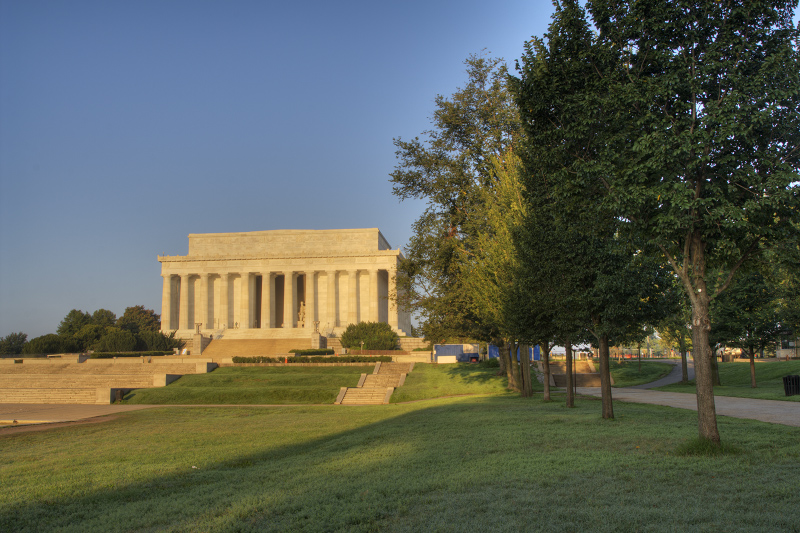
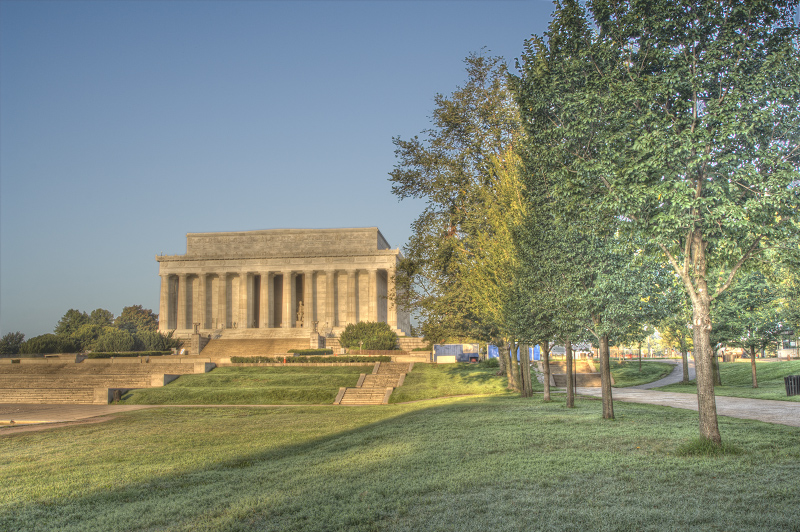
AFTER
Levels
Choose Image > Adjustments > Levels.
Or choose Layer > New Adjustment Layer > Levels. Click OK in the New Layer dialog box
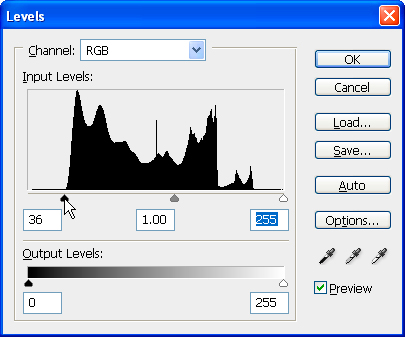
The outer two sliders map the black point and white point and by default are zero for black, and 255 for pure white. Drag the black and white sliders inward until they just begin to touch the main group of pixels. Hold the Alt (Option) key to show clipped pixels when sliding. How far past clipping you move the sliders is a matter of taste, however, it’s good practice to move the sliders to at least the beginning of clipping. Because HDR images have compressed tonal ranges this post processing step is essential for all HDR images.
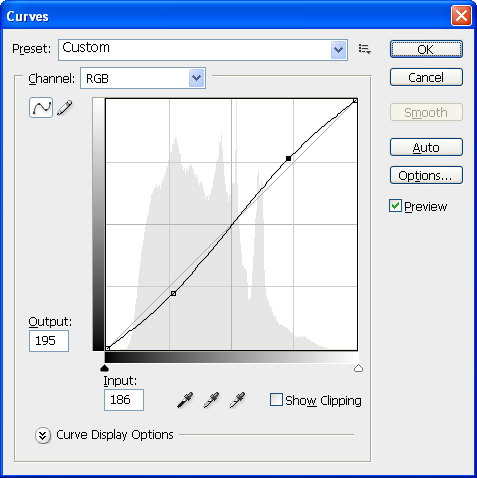
Curves
Choose Image > Adjustments > Curves.
Or choose Layer > New Adjustment Layer > Curves.
To add a point along the curve, click directly on the curve or Ctrl (Cmd)-click a pixel in the image to locate a specific tonal range. Move the point on the Curves line to adjust the tones in the image.
For your HDR image the object is to preserve highlights and shadows and add contrast to the mid-tones by creating a minor “S” shape to the line.
Blue Skies and Halos
“I’m into mad-crazy compression but when I have a blue sky it doesn’t look to good.”
The best way to deal with the halo problem is blending the HDR image with one of the source images.
Here is the Lincoln Memorial with dramatic compression from a high strength setting in Photomatix. The best way to correct the problem is using layer/mask in Photoshop and blend the –2EV image with the tone mapped image.
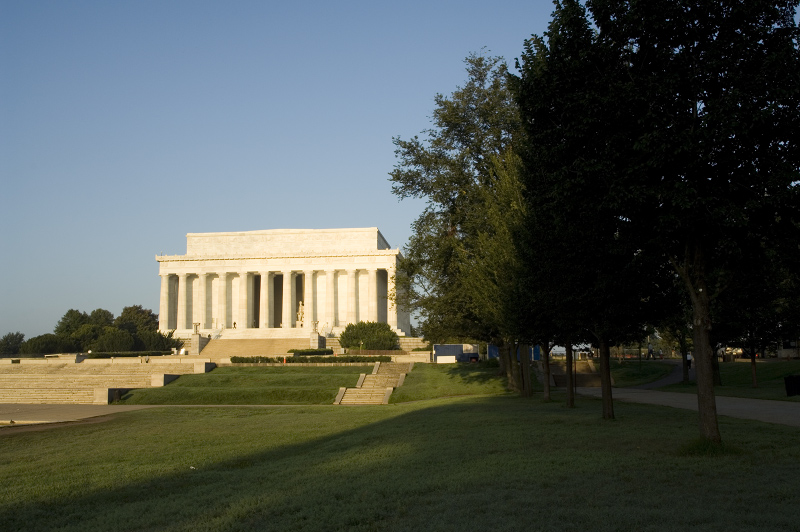
But why the -2EV image? Choose the source image based on good exposure of the needed area. I need the exposure with the best blue sky and that happens to be the -2EV image.
Here is the -2EV image. Notice that this is a pretty high contrast scene due a low angle of the sun refecting off the white memorial. Everything looks pretty bad except the sky.
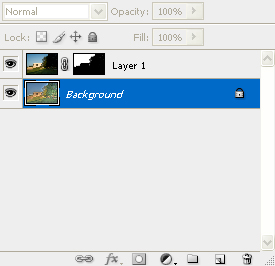
Blending the sky in the Single -2EV image with the HDR image
- Open both images in Photoshop
- Drag the –2EV image over the HDR image, hold the Shift key during the dragging to center the image. Check the alignment by zooming in and clicking the eye icon in the top layer. Use the Move Tool or arrow keys if needed.
- From the –2EV layer select the sky using the Magic Wand Tool. Uncheck “contiguous” and set tolerance to about 20. The Shift key adds to the selection and the Alt(Option) key subtracts from the selection.
- After you have selected all of the sky then feather the selection. In CS3 use the new Refine Edge command to feather the selection, otherwise just feather anywhere from 1-10 pixels. You might have to use the History feature and try a different feather amount so don’t stress over the number you choose.
- Click the Add Layer Mask button in the layers palette (circle inside square) and presto it all comes together.
- Inspect the feathered area and redo if needed with a different feather amount.
- Save final image.
So there you have it. The sky of the -2EV image blended with the HDR image.
SOFT Blend HDR image with Single 0EV image
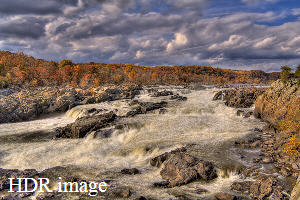
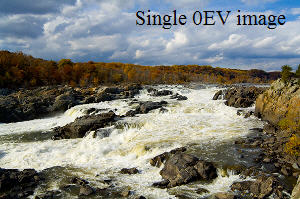
A common occurrence in HDR images is graying or darkening of features that should be white. Here the water flowing in the Potomac River looks muddy compared to the single 0EV image. I decided it would look better to brighten the water to add contrast and make it look cleaner.
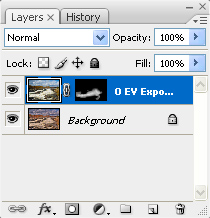
Here’s the Layer palette with the 0EV image and a Layer Mask. Notice the Layer Mask is not painted pure white in the area of the water. If it had, 100% of the 0EV water would show rather than a blend of the two. This is similar to the above steps.
- Open both images in Photoshop
- Drag the 0EV over the HDR image; hold the Shift key during the dragging to center the image. Check the alignment by zooming in and clicking the eye icon in the top layer. Use the Move Tool or arrow keys if needed.
- If I prefer to get a mix of both images, I can change the Opacity % in the Layers Palette. In this case a Layer Mask is not needed.
- Add a black Layer Mask by holding the Alt (Option) key while clicking on Add layer mask. This is a good step to commit to memory. It works for lots of blending.
- This will allow you to “see through” the entire top layer.
- Using a soft brush, paint the water of the 0EV image with WHITE allowing the 0EV water to appear. This is a fun type of blending. Just keep your finger on the “x” key and use the other hand to paint away. If something is not right just press “x” to paint over the mistake.
- I could have used a technique similar to the waterfall image by painting in black but it would have been much more work to paint the sky, trees and rocks. In this example, it’s easier to first create an all black mask then paint with white.
- Save the final image.
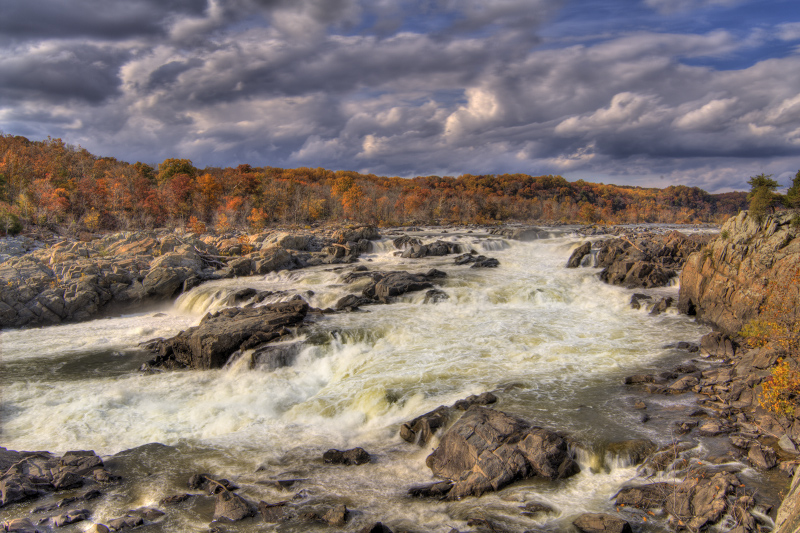
The final image is a soft blend of the HDR image and the 0EV image.
SHARP Blend of HDR image with Single Image
The Potomac River blending calls for the use of a SOFT edge or a gradual blending of the two images. If your blending edge needs to be SHARP, which could be for a building, a sign, a car or boat then you can use the Polygonal Lasso Tool and a hard edge Brush to select the area. This method isn’t so carefree like we found in the soft blend, it can be more tedious and time consuming.
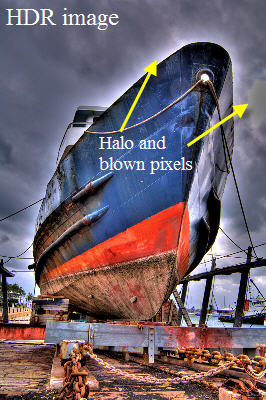
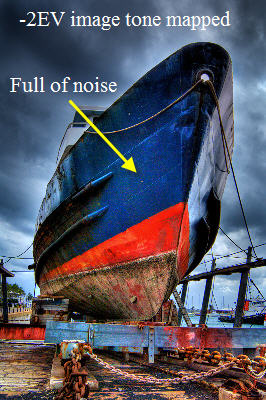
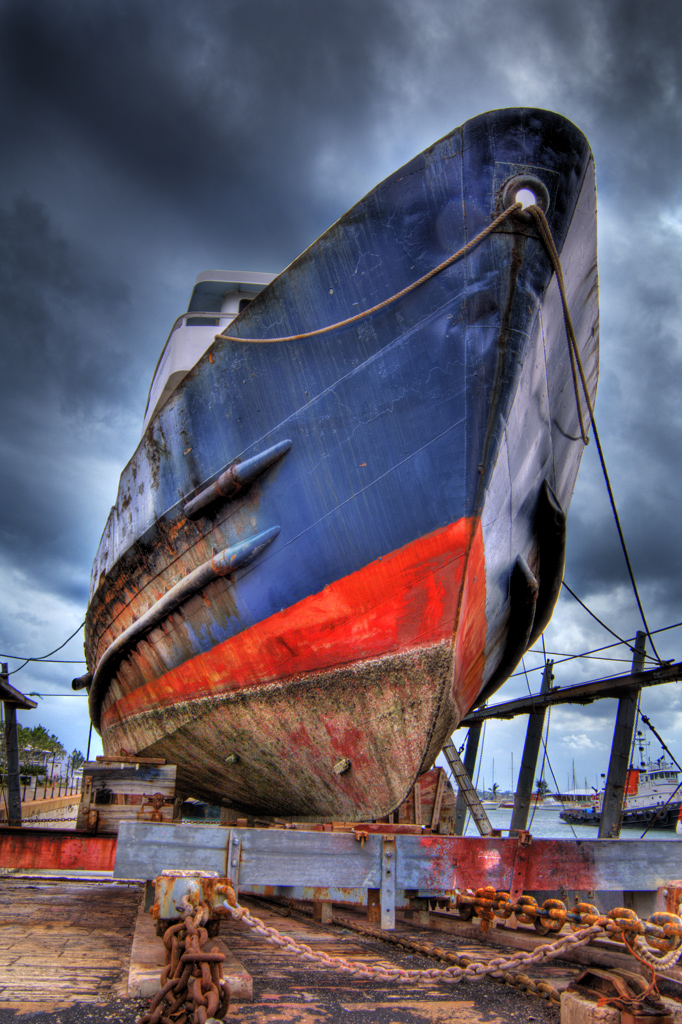
The left image is the HDR image from 5 images @ 1EV spacing and the right image is the single -2EV image tone mapped in Photomatix. Although I like both, the HDR image has a halo and blown pixels in the sky, and the -2EV image is full of noise in the boat hull. The solution is to blend the good parts of each image. The sky of the -2EV will be blended into the HDR image along a sharp line.
-
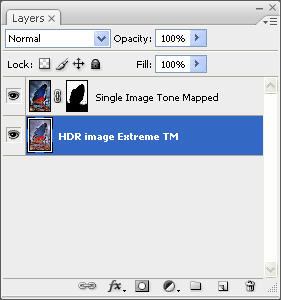
Begin by dragging the Single Image over the HDR image.
-
You now have two layers a background and Layer 1. (I’ve renamed them HDR image Extreme TM and the Single Image Tone Mapped).
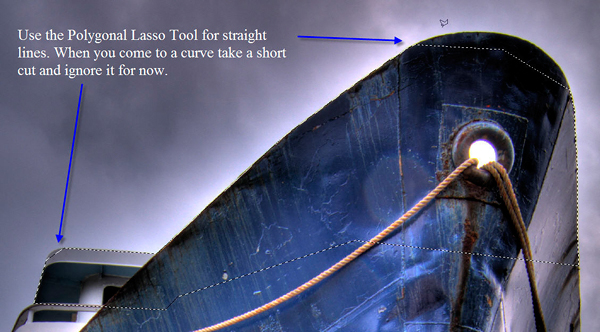
MAKE THE SELECTION
STEP 1
-
Choose the Polygonal Lasso Tool for staight lines. Zoom in and follow the lines to select. Press the Space Bar to drag the image to a new position.
-
Hold the Shift-key to add to the selection or the Alt(Option)-key to subtract from the selection.
STEP 2
Once I select all my straight line sections I can begin selecting curved and odd shaped regions.
-
Change to Quick Mask mode – bottom of Tool Bar is a square with circle in it. Click it and the UNselected areas turn red.
-
Choose a Paint Brush with Hard Edge and paint the curved areas using White.
-
If you over-shoot the selection just hit the “X” key to change from white to Black.
-
After creating the hard edge selection it needs to be feathered. Go to Select>Feather(CS2) or Select>Modify>Feather (CS3). Set the feather amount to about 1-10 pixels, I usually go very low for a first try.
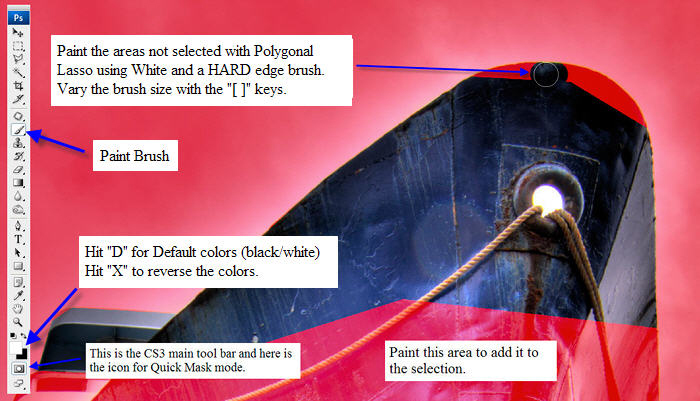
NOTE: CS3 has a new selection tool that is really worth the price of admission. It’s called the Quick Selection Tool and it’s located on the main tool bar with the Magic Wand Tool. All you have to do is drag the tool near the edge of the feature you want to select and it builds the selection as you go. It’s spot on about 90% of the time and if it misses just use the above techniques to add or take away from the selection.
SELECTION COMPLETE!
Ok, now the ship and dock is selected. I didn’t worry about selecting the scaffolding around the boat and other minor features that have the sky as the background because they look the same in both images.
-
In the Layers palette choose the upper layer if you are not there already, it will be blue.
-
Click on the layer mask icon (the square with circle). Hold the alt-key while clicking the icon will make the selection black. Anything black on the upper layer becomes a “window” to the layer under it.
NOTE: It’s sometimes hard to know if you need to hold the Alt-key while clicking the layer mask icon. Fortunately, you can go to the history window and back out any wrong choices. I do it all the time.
That’s it! The final image is a blend of the HDR image and the sky of the -2EV image.
Blending Two HDR images
It’s possible to create two different tone mapped HDR images of the same scene and then take the good parts of each image and blend them. When tone mapping an image it’s not unusual for a particular compression setting to look great for one part of an image but not another. In this example, I’ve not only created two different tone mapped images but I’ve used two different programs to do it – Photomatix and FDRTools.
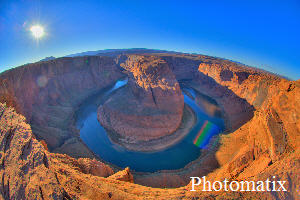
FDRTools does a very good job of creating strong local contrast enhancements and Photomatix is very good with blue skies. The basic approach is to use the canyon from FDRTools and the sky from Photomatix. Each image undergoes an entirely different compression scheme. The canyon scene is highly compressed which causes the sky to develop problems with vignetting, noise, and posterization. Notice the high values for compression and contrast for the FDRTools image. Conversely, in Photomatix the sky scene is lightly compressed with minimum contrast and maximum smoothing. This compression scheme creates a noise free sky with smooth tonal gradations.

FDRTools – Compressor for maximum Crispyness in the canyon
Compression 9.0 (high setting)*******
Contrast 6.5
Smoothing 1.3 (low setting)*******
Photomatix – Details Enhancer for maximum smoothing of sky. The goal is a noise-free sky.
Strength 50 (low setting)*******
Color Saturation 80
Light Smoothing 0
Luminosity 0
Micro-contrast –2 (low setting)*******
Micro-smoothing 30 (high setting)*******
White Clip 0.00%
Black Clip 0.00%
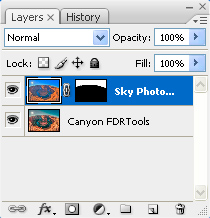
Blending two HDR images is the same as blending any other image set.
- Open both images in Photoshop
- Drag the Sky Photomatix image over the Canyon FDRTools image; hold the Shift key during the dragging to center the image. Check the alignment by zooming in and clicking the eye icon in the top layer. Use the Move Tool or arrow keys if needed.
- From the Sky Photomatix layer select the sky using the Magic Wand Tool. Uncheck “contiguous” and set “tolerance” to about 20. The Shift key adds to the selection and Alt(option) key subtracts from the selection.
- After you have selected all of the sky then feather the selection. In CS3 use the new Refine Edge command to feather the selection, otherwise just feather anywhere from 1-10 pixels.
- Click the Add Layer Mask button in the layers palette to reveal the Canyon FDRTools image.
- Inspect the feathered area and redo if needed with a different feather amount.
- Save final image.
Hey thank you for checking out this tutorial. Check back, I update my blog often. New stuff on the way!
 My latest book is about the new and exciting techniques in HDR Photography.


First of all, thanks! you totally made my day! =D I mean, night ^^ and even thought I understood like 70 percent of what you’ve explained I’m happy I got here! I first got to your flickr and immediately asked to myself ‘HOW IS THAT PICTURE EVEN POSIBBLE????’ and BAAAM!! there it was: the link to your wordpress site + tutorials. I cried a little bit, I admit, but it was pure joy. So here I am thanking… actually I’ll thank myself on this one. I was the one that was bored as hell doing some really late lurking that found you. so thanks ME for finding you! hooray! and thank YOU for making this possible. Actually that thank will have to go to your parents… but… well, you ARE the one who wrote this and I’m commenting at YOUR site, so I’ll leave the thanks to you. THANK YOU =D
I’ll be back for some more reading or rookie concernig questions =D ( hopefully you won’t get too irritated by that last ^^ )
take care. bye!
( I’m a rookie at taking a picture with not just pressing a button and I’m from Chile -no wonder I lacked that 30 percent- )
Hi Ignacio, I enjoyed your comments and thank you for the smile you put on my face, from one happy person to another.
Regards, Ferrell
Comment by Ignacio — April 14, 2007 @ 4:44 am
Thank You
Comment by Alex — April 24, 2007 @ 1:37 am
Thanks for the effort you’ve taken to put all this together. Definitely appreciate it. One thing that’s been lacking in HDR tutorials, IMO, is the post-processing part. Many times I’ve heard, “Oh, fix that w/ layers/masks/blahblah, etc.” That’s fine and dandy if you’re articulate in the ways of Photoshop/GIMP/Fireworks. However, it just leads me (and I’m guessing quite a few others) to a head-banging-against-wall session. I have yet to actually try your tutorial, but read through and it looks like it’s easy enough to follow. A thanks from me and all the silent voices that are reading but not posting.
Fried Toast, I think you’ll find most post-processing tutorials are brief because that’s where the experts protect their most coveted secrets. The best way to learn is spend a little time on-line each day learning a new editing technique, keep a spiral notebook by your computer and keep notes with subject headings, post notes all around your monitor, drink coffee, write small, stay current, there’s lots to learn, good luck, Ferrell
Comment by Fried Toast — April 25, 2007 @ 5:19 am
thank you for putting the effort for us to learn.
Comment by lisa — May 20, 2007 @ 12:52 am
excellent! thank you very much for taking the time to provide us this extremely informative tutorial.
Comment by Diego — June 21, 2007 @ 12:59 am
Thanks for your time in writing this very good tutorial. Its people like yourself who makes this group an excellent place to learn.
Comment by Gerry Roberets — August 7, 2007 @ 3:56 pm
This tutorial is extremely helpful. Thank you for posting it! I’ll give it a try! DeeDee G.
Comment by DeeDee Gollwitzer — August 16, 2007 @ 12:03 pm
Good article! A lot of people (especially the HDR photographers I see on Flickr) should read this. Too often I see results straight out of Photomatix that look totally unnatural – but judging from the comments realism is no longer something to strive for. The contradiction is that HDR is meant to capture large contrasts, but Photomatix often gives results that have a very limited dynamic range.
What I usually do is overlay the tone-mapped image with the metered version (or sometimes, as in your article, one of the others) and vary the opacity of that layer – somewhere between 25-60% gives good results. For instance: in your Lincoln image I would overlay the -2EV image (completely, not just a part) at 60% opacity – IMHO that gives a much better dynamic range.
Hi Theo,
Have you ever seen a kid with finger paints for the first time? They couldn’t put enough color on the paper, more paint was great and if that wasn’t enough, mixing it was even better. That’s how we all start with our first HDR then in time we come down to earth and refine our technique as you have described. Thank you for stopping by, Ferrell
Comment by Theo Jacobs — November 10, 2007 @ 8:06 am
Hi! So Great tutorials!
I do have one workflow qustion, you guys might be able to answer:
I load my raws into bridge
I convert and save to 300ppi TIFF in camera raw/PS3
I convert to HDR and tonemap in Photomatix and saves (as 72ppi TIFF)
I convert the 72ppi HDR TIFFs to 300 ppi JPGs for print
Photomatix saves at 72ppi TIFF. Is that a problem? Can I change that somewhere? I want to be able print large sizes.
Is it better to use raws in photomatix or JPG’s?
Is there an advantage using TIFF format, because they get really big!?
Thanks for this site
Regards Charlotte
Hi Charlotte,
Converting your RAW image to TIFF is fine as long as you don’t apply adjustments, just save the default file to TIFF. I prefer not making the conversion as it gobbles up lots of disk space. 72ppi in Photomatix is not a problem, just another way of expressing the same thing at 300ppi. As for shooting RAW vs. JPG I personally shoot RAW for the added range captured. Also if I decide to use one image and tonemap that, I have more to work with.
Comment by Charlotte Hammer — November 22, 2007 @ 5:40 am
To me it is necessary to find
Comment by NimaLakyLiacy — February 24, 2008 @ 2:13 pm
amazing!!!! i really have a hard time doing HDR.. i’ll try this tutorial of yours. thanx
Comment by ryan de gracia — February 27, 2008 @ 8:20 am
Hi Ferrell,
Amazingly detailed tutes, you are very generous with
your knowledge and experience. The book sounds great too
will grab one for sure. 🙂
My question is to do with the amazing amount of depth of
field your work (and a lot of HDR images out there) seems to have.
Is this just from using a very small aperture and sharpening in post, or
is there more to it than that?
Best,
AB
Comment by AB — March 31, 2008 @ 7:10 am
Awesome tutorial! I will try to use this for my wedding photography someway somehow haha
Comment by Furious Photographers — July 15, 2008 @ 11:04 pm
Hello, beforethecoffee.wordpress.com
all but a year ago now, my computer got a positively significant virus. I’m not infallible how it started, but my computer kept infuriating to run unrecognized programs and would and signs and symptoms of heart problems become fixed up emere after it was turned on from infuriating to run them. My cousin who has IT episode tried to assistants us out. We got the computer stabilised and workable and ended up re-installing Windows upward of the corrupted version. At the age we cogitation the difficulty was dealt with. yet, we installed multiple virus scanners and ran scans with AVG unshackle, Virusinspect, Spybot, A
d-apprised, Xoft-Spy, Stinger and an Online glance at from Symantec safeguarding Check. Most of these were determination no difficultys, but AVG detected divers viruses that it couldn’t right and filed away. The computer was degree slower, but wasn’t too noticable at the age. greater than the ultimate few months, the computer has been getting slower and slower and a large amount of array on the pragmatic allude has disappeared. We had up 100GBs fist after the virus and now are down to fro 10GB settle accounts even so we are constantly un-installing programs and we haven’t satisfactorily files or programs on the computer to transform up all the abandoned blank. This combined with the computer slowing down to a snail-creep boost all the age has made it frustrating to use at best. If anyone could swear off me any assistants, it would be quite much appreciated.
Deckard’s structure inspection
Run by Gerry on 2008-06-23 01:10:41
Computer is in natural Mode.
Comment by LugThoubmub — August 2, 2008 @ 10:38 am
Hi!!! Your tutorial is so great that I decided to buy your book. Really excellent job, thank you very much!
Comment by peve — September 5, 2008 @ 10:49 am
Hello,
Great tutorial. I love HDR imagery and I have been working on improving my techniques. Post processing is key to having great images, and this tutorial is very nice. I love the book and I assume I will see you a the Bowie Photo club competition next Monday.
Thanks,
Comment by Roberto Ramirez — November 5, 2008 @ 10:28 am
hai,there is a nice collections
Comment by jana — November 6, 2008 @ 3:01 am
Thanks for the great work you do. One question how can I tone map a single image it seems that photomatix does not allow me to do it ?
Hello Martin, You can tone map single images IF and only IF they are RAW, 16-bit tiff, or .HDR (or .exr) files. Just go File>Open choose your file then go Process>Tone Mapping. If Photomatix won’t allow you to tone map the single image it’s because you need to convert it first from the 8-bit pixel depth to the 16-bit in another image editing program like Photoshop. Good Luck.
Comment by MArtin — February 22, 2009 @ 6:45 am
Bookmarked. Can’t wait to try this out.
Comment by themisfit — February 22, 2009 @ 2:50 pm
It is obvious how much time and effort you have devoted to mastering your own knowledge (and passion) of HDR. What may be less obvious to any who have never published anything is how much time you have devoted to creating the truly exceptional materials on this website. It is a huge effort. Truely a gift to your readers who wish to learn and refine their craft.
“Thank you” hardly seems adequate. Looking forward to recieving your book.
Comment by Paul Yarnall — March 12, 2009 @ 1:16 pm
Hello!
Very Interesting post! Thank you for such interesting resource!
PS: Sorry for my bad english, I’v just started to learn this language 😉
See you!
Your, Raiul Baztepo
Comment by RaiulBaztepo — March 28, 2009 @ 4:59 pm
Hi !!!! ^_^
I am Piter Kokoniz. oOnly want to tell, that your posts are really interesting
And want to ask you: is this blog your hobby?
Sorry for my bad english:)
Thank you:)
Piter Kokoniz, from Latvia
Comment by PiterKokoniz — April 7, 2009 @ 6:32 pm
Ferrell,
Thoroughly enjoyed your HDR Guide. This subject was introduced in a PS course I recently completed, but it left me wanting much more and your book certainly delivered! One item I was curious about that I didn’t come across concerned Tone Mapping settings. Within Photomatrix Pro, Details Enhancer or Tone Compressor values can be saved as Presets…but can or are these values saved with the HDR image file that can be easily referenced later? Thanks for all the outstanding tutorials and I can say for anyone new to HDR and considering your book, it’s a must. Thanks. Ken
Hi Ken, thank you for you support. The Tone Mapping settings are saved as an .xmp file. You can reference the files to that image just be sure to place the file in the same folder and name the file the same as the image ie. DSC6880_79_78_tonemapped.tif AND DSC6880_79_78_tonemapped.xmp Take care, Ferrell
Comment by Ken — April 26, 2009 @ 1:04 pm
thanks for your great website! It really steps up my skills and gives me so much new ideas 🙂
Comment by Marcus — May 12, 2009 @ 11:33 pm
Hi,good tutorials btw just want to ask.how do I save the photos as jpeg after I process the HDR photos in Photoshop?
Comment by mks — June 27, 2009 @ 5:37 am
I have read several books on HDR which opened the door to the process, but your tutoring on the post-processing was just the help I need to get the finished look I was striving for. Thanks
Comment by Joni — July 14, 2009 @ 12:21 am
Thanks to Flickr and to you for your contribution to this tutorial discussion! I thought creating an HDR image was running 3 images through Photomatix, period. I can’t wait to re-do some of my HDR’s. Thanks.
Comment by Dennis — July 15, 2009 @ 4:21 pm
Thanks so much for your generosity in sharing your knowledge. You’ve revealed new levels of HDR processing I had no idea existed. Thanks to you, I have some new adventures in photography to get excited about.
Comment by Russ — August 21, 2009 @ 3:57 am
Hi and thank you so much for your tutorial.I have been looking everywhere for a decent step-by-step postprocessing tutorial.Finally i can deal with those gray skies and weird halos.
One quick question though about importing raw images.I shoot with a eos 500d.
As many people suggest (including the photomatix staff) its slightly better to convert the raw images to 16bit tiff before importing them.When converting DPP sets the in camera sharpness to 3 as defined by the standard picture style(the other sharpening options eg unsharp mask are set to zero).From my point of view sharpening should be the last step of photo editing. I suspect that that sharpness will introduce some noise later on the hdr process. So is it best to keep the in camera sharpness set to zero upon converting the raw images?
And what do you think about directly importing raw to photomatix?
Thank you very much greatly appreciated.
Comment by agiak — November 23, 2009 @ 1:44 pm
Great Tips. I have yet to mess around with HDR, but this will for sure come in handy. I think it does wonders with the sky….
Comment by Aspen Wedding Photographer — December 28, 2009 @ 11:33 pm
Excellent tutorial, glad i found your site as these have helped give my HDR images that little bit extra umpf than running straight through photomatix.
Excellent job
Comment by Gareth Jones — January 23, 2010 @ 1:50 pm
I am normally so lazy using actions so my post processing suffers as a result! – I’ll be definitely trying to use some of these principles for my wedding photography in the future – many thanks for sharing!
Comment by Jinger Studios — January 24, 2010 @ 1:32 am
thanks for the tutorial can’t wait to try this out.
Comment by Kelowna Photographer — March 15, 2010 @ 11:45 pm
[…] far away from my new appartment. These shots were taken awhile back, but I decided to follow this great tutorial to see what I could come up with. As mentionned in previous posts, I sometimes end up with halos […]
Pingback by HDR churches – plateau Mt Royal « Nemezees' Photo Blog — March 29, 2010 @ 5:57 pm
So great I just ordered your book, really great stuff. I have a question I have been using photomatix pro for about a week now…Im noticing in a lot of my images after they are processed in photomatix, that the image ends up looking like a stereoscopic image…there is bright magenta around the edges, Im assuming this is do to tripod movement…But i have a real sturdy setup. Is this normal? And any suggestions would be really great. as a lot of these pictures are for school. thanks so much for your time. here is a link to a picture illustrating this.http://i179.photobucket.com/albums/w300/soulrider911/Screenshot2010-05-08at91753PM.png
Comment by Brady — May 9, 2010 @ 12:26 am
thanks so much. this is all VERY helpfull!!!!
😉
Comment by Chris — July 14, 2010 @ 2:45 pm
[…] the good sky. This is actually covered (using a picture of a freighter no less!) in this tutorial: https://beforethecoffee.wordpress.com…sing-tutorial/ Immensely helpful. P.S. consider using a filter or polarizer to retain the sky`s blue character […]
Pingback by Longline fishing vessel "Raven" before and after — July 18, 2010 @ 9:17 pm
thank you for the information,
This was helped,
spirit! ! ! ! !
Comment by jobvacancies — August 11, 2010 @ 4:51 pm
Right-minded started new occupation:
http://ian.blogs.telrock.org
Comment by michealbp69 — July 26, 2018 @ 6:58 pm
Proposal attendant moved:
http://willie.forum.telrock.net
Comment by berniceyr69 — August 18, 2018 @ 1:10 pm